Before I start my post about the upgrade process from MySQL 4.0 to MySQL 5.0 on 1and1.com that will be laced with keywords and links to sites that have a higher page rank than mine, I’d like to thank ALL the people that take the time to post solutions to life’s internet problems. THANK YOU.
SKIP DOWN TO INSTRUCTIONS buy using the continued reading link if you just can’t wait
Most every time I have a computer or blog problem, the solution is to visit Google. ( I think their page rank is higher than mine ) Because somebody has taken the time to make a post on a forum or a blog their experience with a problem, the answer to most questions can be found on the internet. It wasn’t always that way. Once a upon a time if you wanted information you went to the library. In fact, when I was younger I walked a mile in the snow to visit the library to look something up. ( OK, there was no snow, but I have walked a mile to the library ) Now you sit at home, turn on the computer, pick a search engine such as Bing.com and all the information in the world is there for you to see. That’s pretty friggin amazing if you think about it.
OK, a quick history. Before late last year I had no idea in the world what MySQL 4.0 was, and I didn’t really care. I’m guessing most bloggers didn’t care either. All that changed when WordPress announced the release of WordPress Version 2.9.2. With this latest version of WordPress came the news that WordPress upgrades would no longer support MySQL 4.0. Your blog would now have to run on a server using MySQL 4.1.2 or higher. For most people hosting their own blogs this wasn’t a problem. It was a problem for those of us who were using 1and1.com and had started our blogs a couple years back. The main problem being that those blogs were on version 4.0 and that the files were too large for quick and easy transfer. Noting the problems some were having making the transfer over to MySQL 5, I didn’t upgrade my WordPress blog to the newest version. While I consider myself more tech savvy than most, I certainly don’t fall into the super geek computer expert category, so I waited till the folks on the bleeding edge made the conversion and posted their how to articles. I would like to thank Don Campbell of expand2web.com and his blog post for getting me most of the way through the upgrade from MySQL4.0 to 5.0. Here is his blog post that chronicled his journey through the upgrade process. You might want visit his post and print it out. It gave a very good general outline on the process. My post is intended as more detailed set of instructions for those who aren’t on the bleeding edge of technology.
Note: These instructions are for PC users, Mac users can just click their heels together three times saying “Mac can do it, Mac will do it.” each time and your computer will do all this for you. ( How’s that for key wording. A Wizard of Oz reference in a post about WordPress blogs and upgrading MySQLÂ )
INSTRUCTIONS
STEP ONE – YOU MUST DO THIS!!
This is the MOST IMPORTANT instruction you will get. Download a COMPLETE BACKUP of your blog. You should be doing this anyway on a regular basis, but you REALLY, REALLY want to do it now before you start fooling around. I backup my blog by using my the free FTP solution FileZilla. The backup may take awhile. My blog’s contents are 140MB large, and backing them up using Comcast high speed internet takes a good 10 to 20 minutes. OK, now the fun begins.
STEP TWO – EVERYTHING ELSE
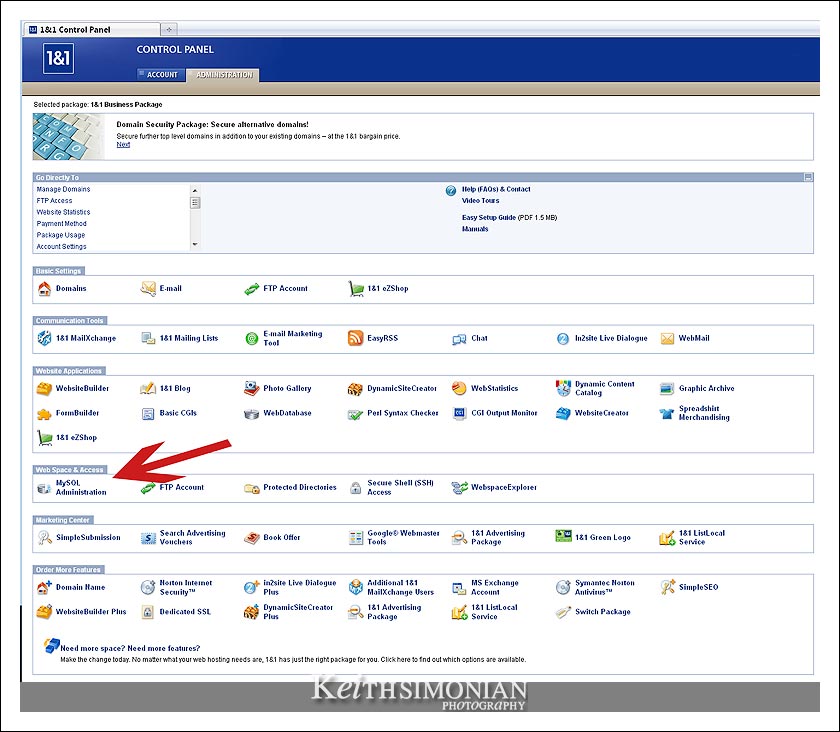
You are going to log onto your 1and1.com account and create a new MySQL 5 database. I’ve tried to include pictures of every step because it turns out finding everything you need on the 1and1 dashboard isn’t quite as easy as one would hope it would be. Your control panel should look like this, and you want to select the “MySQL Administration” icon in the Web Space and access section of the dashboard.
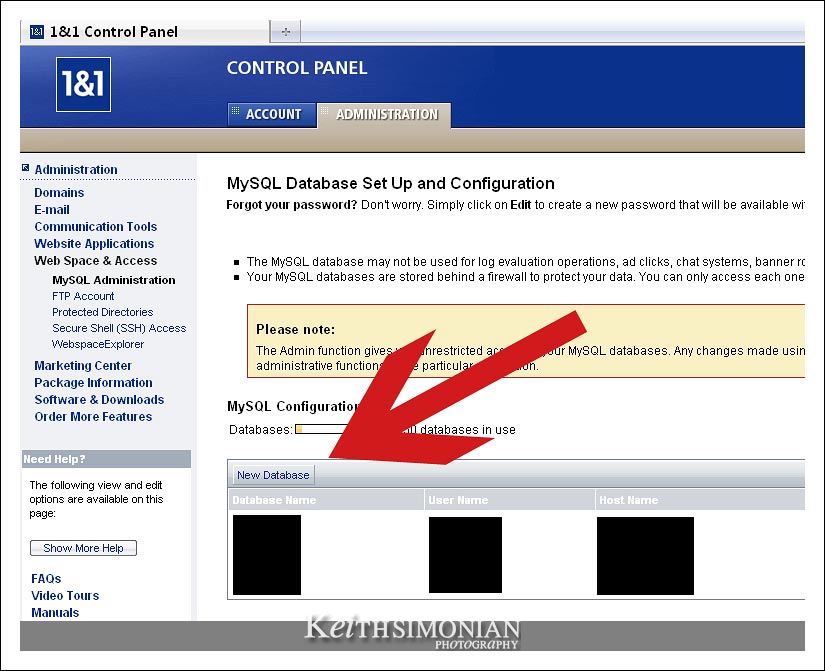
Next you want to create a new database by clicking the icon shown next to the giant red arrow.
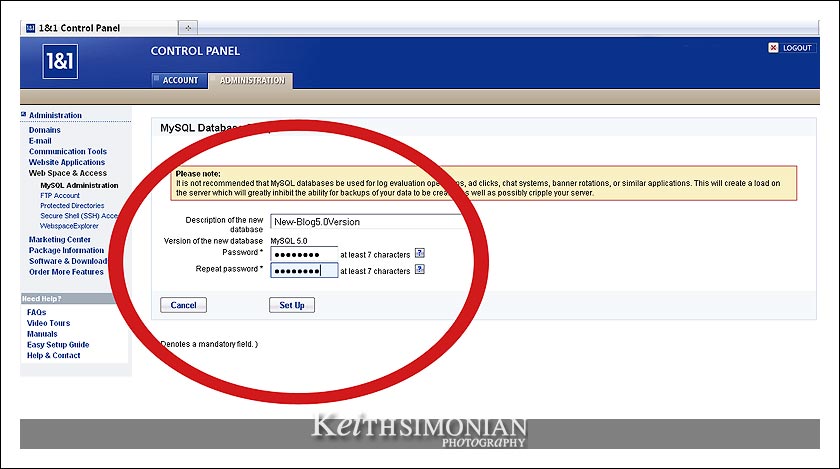
In the area selected by the large red circle you want to fill in the required boxes and click the setup tab. Use what ever name you feel will help you find this new database. Make sure to write down the password you have selected. Without it, you are toast.
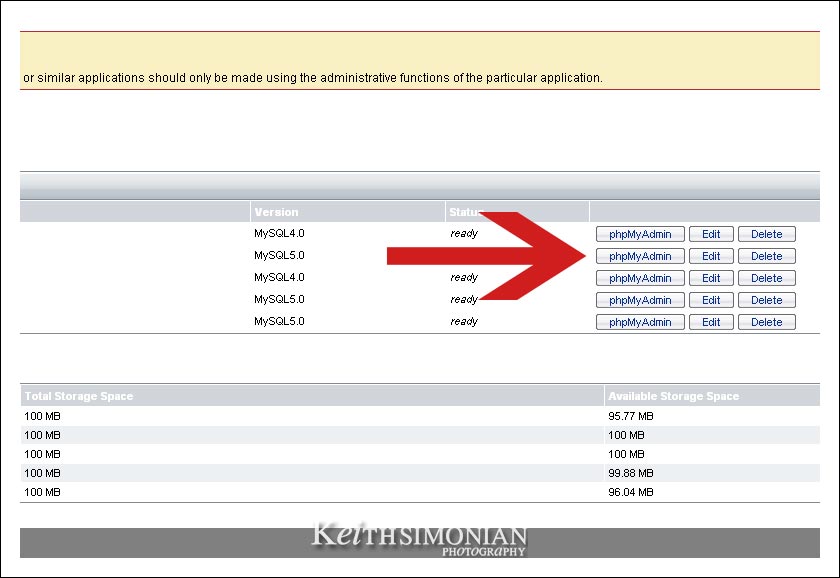
The newly created MySQL database will take a while to set up ( 10 to 40 minutes ), so you need to move on to the next task at hand, that being to export the old MySQL 4.0 file. Go back to the previous control panel and select the phpMyAdmin tab indicated by the large red arrow in the photo.
When the next control panel pops up, you want select the MySQL export tab as indicated by the arrow in the photo.
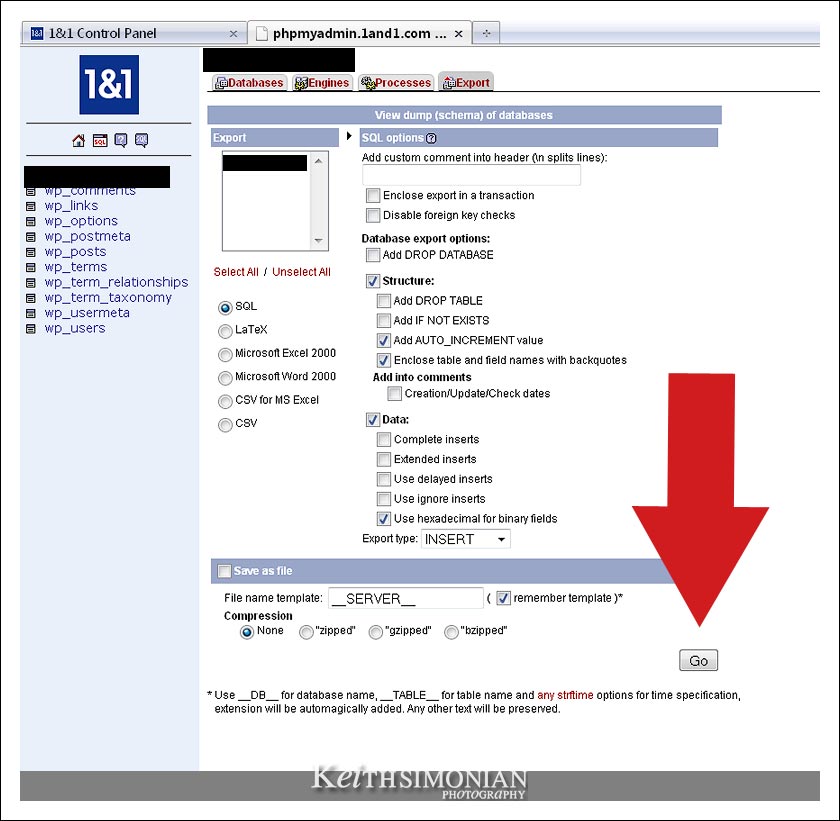
That should give you the widow shown in the photo below. You shouldn’t have to make any adjustments to the boxes in the control panel, just click on the go tab that is highlighted by the red arrow.
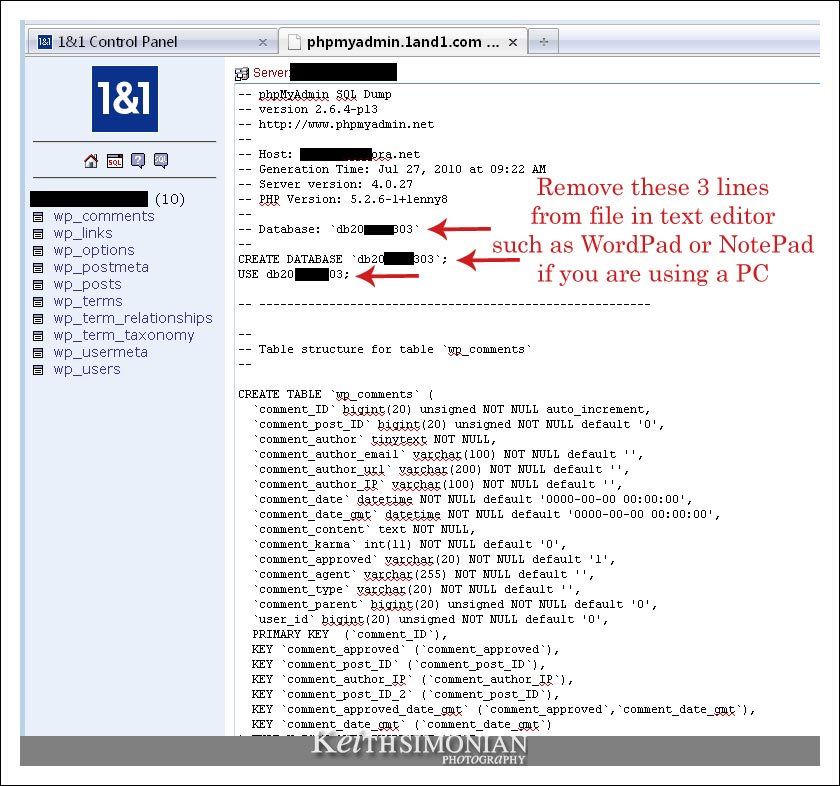
It may take a moment or two for the next page to display all the info in your MySQL file. Once the file is loaded you want to copy and paste the entire file into a text editor. ( Wordpad or Notepad on a PC, Mac users should call Steve Jobs and see what he suggests ) After you have copy and pasted the file into a text editor you need to remove the three lines shown by the red arrows that sit at the top of all the text. If these lines aren’t removed you won’t be able to import the file into the newly created MySQL 5 database. Now save the file.
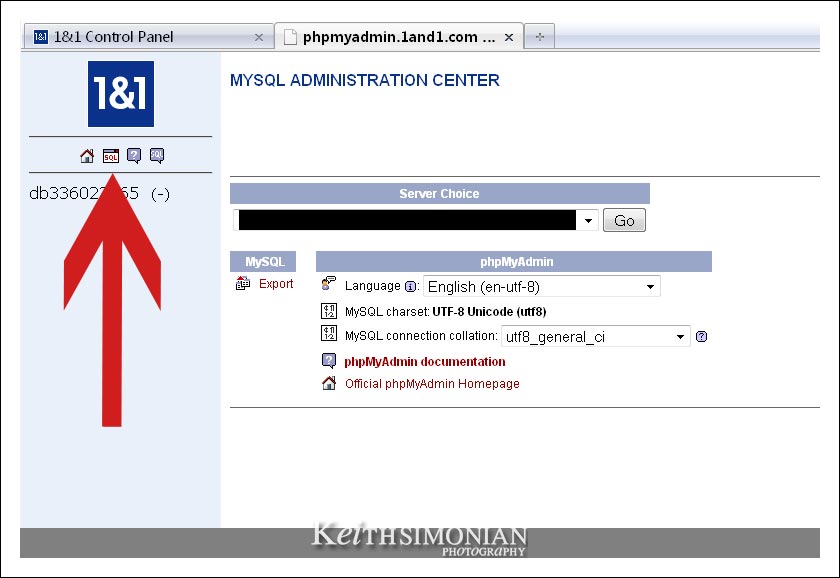
Log back onto the 1an1 control panel, then the MySQL Administration, then select the phpMyAdmin tab for you newly created MySQL 5.0 database. That should put you at the display shown below. Next select the SQL icon shown in the image below.
If things are going correctly you will have the display shown below. You will now copy and paste the text file you created into the box. The copy and paste action may take a moment or two as the copy and paste action isn’t really designed for files this big. Once the file has been pasted in the box, hit the go button. It was my experience that nothing happened very quickly after hitting the go button. Don’t do anything for a moment or two. You are uploading a rather large file and it will not happen instantaneously. In fact as I recall the go tab never appeared to be deselected as though the upload was complete. But it was. It would have been nice had the control panel that listed the total storage each database shown the file was uploaded. It didn’t. At least not right away. I was only able to confirm the upload the next day. It may not really have taken that long, but as I have a life, I decided to try and complete the process the next day.
After you confirm that the upload of the database has been completed, it’s time to move on to the last step. You now have a MySQL 5.0 database with all the correct instructions for you blog. You now need to tell you blog to use those instructions instead of the old ones on the MySQL 4.0 database. Here’s how you do that.
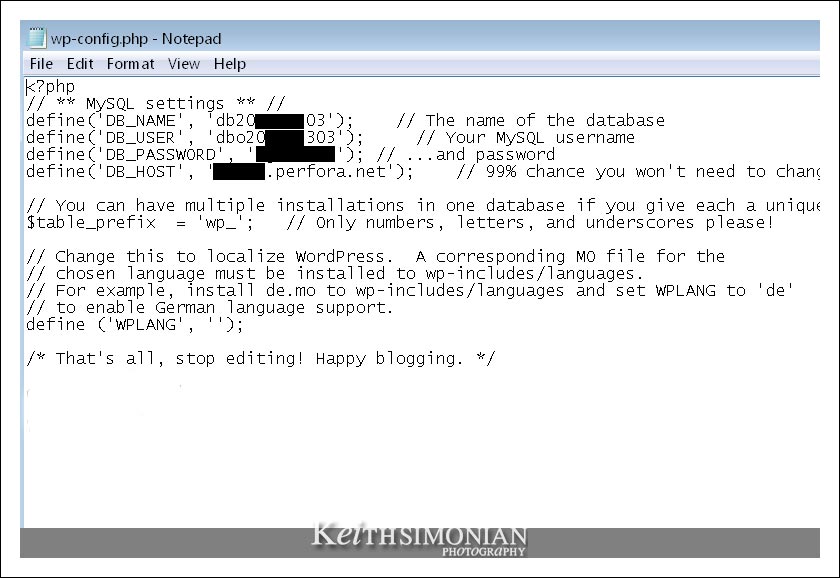
Once again using your FTP software, you want to down load the wp-config.php file from your Blog’s root file. Please don’t do this if you haven’t backed up your ALL of your blog’s files. Not that anything should go wrong, but you really don’t want to try and recreate you entire blog over the next 3 weeks of your life. Next you need to open the file in a text editor. The file should look similar to the one in the photo below. You will need to change the DB_NAME, DB_USER, DB_PASSWORD, AND DB_HOST information from your old database info to the new database that you have created. Save the file. Make sure it’s saved as a “php” file and not as a text file. You are now ready for the last step of uploading the newly minted wp-config.php file to your blog’s base file replacing the old one. What you have done is to tell the blog to now use the new MySQL 5.o database.
If all has gone well you should be able to log into your blog’s administration file and upload the newest version of WordPress blogs. The current version is 3.0.
Hope this helped anybody making the upgrade.

Glad the instructions worked. Like you mentioned, 1and1’s instructions were a little lacking.
Lucky me to find this post. 1and1’s instructions was so pathetic. And many thanks to you, my WP blog is back up again. 🙂
THANK YOU for this post, it saved me probably 3 days and a bottle of Tylenol! Much appreciated!
Well done sir – worked perfectly and instantly 🙂
I recommend Notepad++ myself
Marcus,
If you stick with MySQL 4.0 the most recent version of WordPress you can use is 2.86. Will visitors to your site notice the difference, most likely not. Not upgrading to the latest version of WordPress just makes your site more vulnerable to hackers.
Thanks for this info. I just have my family’s photo blog on WP with 1and1 as my host. Is going from MySQL 4 to 5 even worth it? What am I missing out on if I just stick with 4? Honestly, I don’t know if I’m up for the hassle.
Thanks.
Thank you for taking the time to document this — you have saved me (and doubtless scores of other 1and1 users) from hours of frustration!
Thanks! I think you solved my problem for moving my blog to WordPress 3.01 from 2.0 and MYSQL 4 to 5.
I did have to do a few things different.
There was so much text in my blog’s export window that it caused the import window to hang when I cut and paste the database.
Instead, I saved the database as a .sql file. Then I edited it and changed the three old database name entries at the top of the file to the new mysql 5.0 database name.
That caused a “can not create database error, already exists”.
So I took out the one line that said “create database” where I had put the new db name. Removing that line allowed it to work.
Thanks!
You are a life saver! Thank you!
Thank you! This has been soooooo helpful. 1&1 was no help in getting this done, but your post did the trick! Thanks!